Test Swift Packages with a Test Host

Swift packages are a neat and simple way to bundle up and share code. They remove the overall complexity by not requiring an Xcode project but instead relying on a filesystem-based project layout. That’s all fine and well until your code needs an Entitlement for it to be tested.
Table of Contents
At the time of writing this article (swift-tools-version 5.9), there was no way to include Entitlements directly in a Swift package.
So let’s take a look at the necessary steps to regain testability of your code.
How To Test Swift Packages
The lack of requiring an Xcode project to manage a Swift package simplifies a lot of things; you don’t even need Xcode to develop the package itself! However, it’s a different story if you want to test your package.
The idea for this article came to me while working on a not-yet-released Swift package called “SwiftRegistry”, a simple Keychain wrapper. As Keychain access requires an Entitlement, it was a good example. That’s why you’ll see “SwiftKeychain” or “swift-keychain” all over the article.
The swift CLI supports running tests, but only on the host platform.
That means you can’t test an iOS package and need to use xcodebuild instead to run your code on a device/simulator.
Despite the name, it still works in a project-less Swift package.
First, you need to find the “scheme” to run:
# LIST AVAILABLE SCHEMES
xcodebuild -list

# OUTPUT:
# Command line invocation:
#     /Applications/Xcode.app/Contents/Developer/usr/bin/xcodebuild -list
#
# User defaults from command line:
#     IDEPackageSupportUseBuiltinSCM = YES
#
# Resolve Package Graph
#
#
# Resolved source packages:
#   SwiftKeychain: /Users/ben/code/ios/SwiftPackages/swift-keychain
#
# Information about workspace "swift-keychain":
#     Schemes:
#         SwiftKeychain
Next, you can run your tests by specifying the scheme and where your code code should run:
xcodebuild -scheme SwiftKeychain test -destination "platform=iOS Simulator,name=iPhone 15,OS=latest"If your package doesn’t need any Entitlement, this works fine.
In the case of SwiftKeychain, though, this doesn’t work and your tests fail:
...snip...
Testing started
Test Suite 'All tests' started at 2024-01-23 09:01:34.246.
Test Suite 'SwiftKeychainTests.xctest' started at 2024-01-23 09:01:34.246.
Test Suite 'SwiftKeychainTests' started at 2024-01-23 09:01:34.247.
Test Case '-[SwiftKeychainTests.SwiftKeychainTests testExample]' started.
/Users/ben/code/ios/SwiftPackages/swift-keychain/Sources/SwiftKeychain/Keychain.swift:180:
error: -[SwiftKeychainTests.SwiftKeychainTests testExample] : failed: caught error: "other(status: -34018, error: nil)"
Test Case '-[SwiftKeychainTests.SwiftKeychainTests testExample]' failed (0.059 seconds).
...snip...
The integer-based status codes of low-level Foundation code aren’t very helpful by themselves, but you can easily check out the reason with the following command:
security error -34018

# OUTPUT:
# Error: 0xFFFF7B1E -34018 A required entitlement isn't present.
Even though Entitlements are “just” defined in a file, there’s no way to add them to a Swift package. Instead, you need a Test Host to provide them.
Testing with a Test Host
The commands swift test or xcodebuild test run in their respective environment decoupled from any app (in the case of a Swift package).
However, a “real” Xcode project can specify a so-called “Test Host” for a Test Target, making this host the environment the tests run in instead.
And that’s what we’re going to do!
In my opinion, one of the main advantages of Swift packages is their project simplicity and easy way to be shared. Creating a Swift framework in Xcode undermines that simplicity. That’s why a hybrid approach is preferable: a Swift package that’s also an Xcode Framework project with an accompanying Test Host.
Step 1: Creating an Xcode project
The first step is creating the Xcode project that holds it all together.
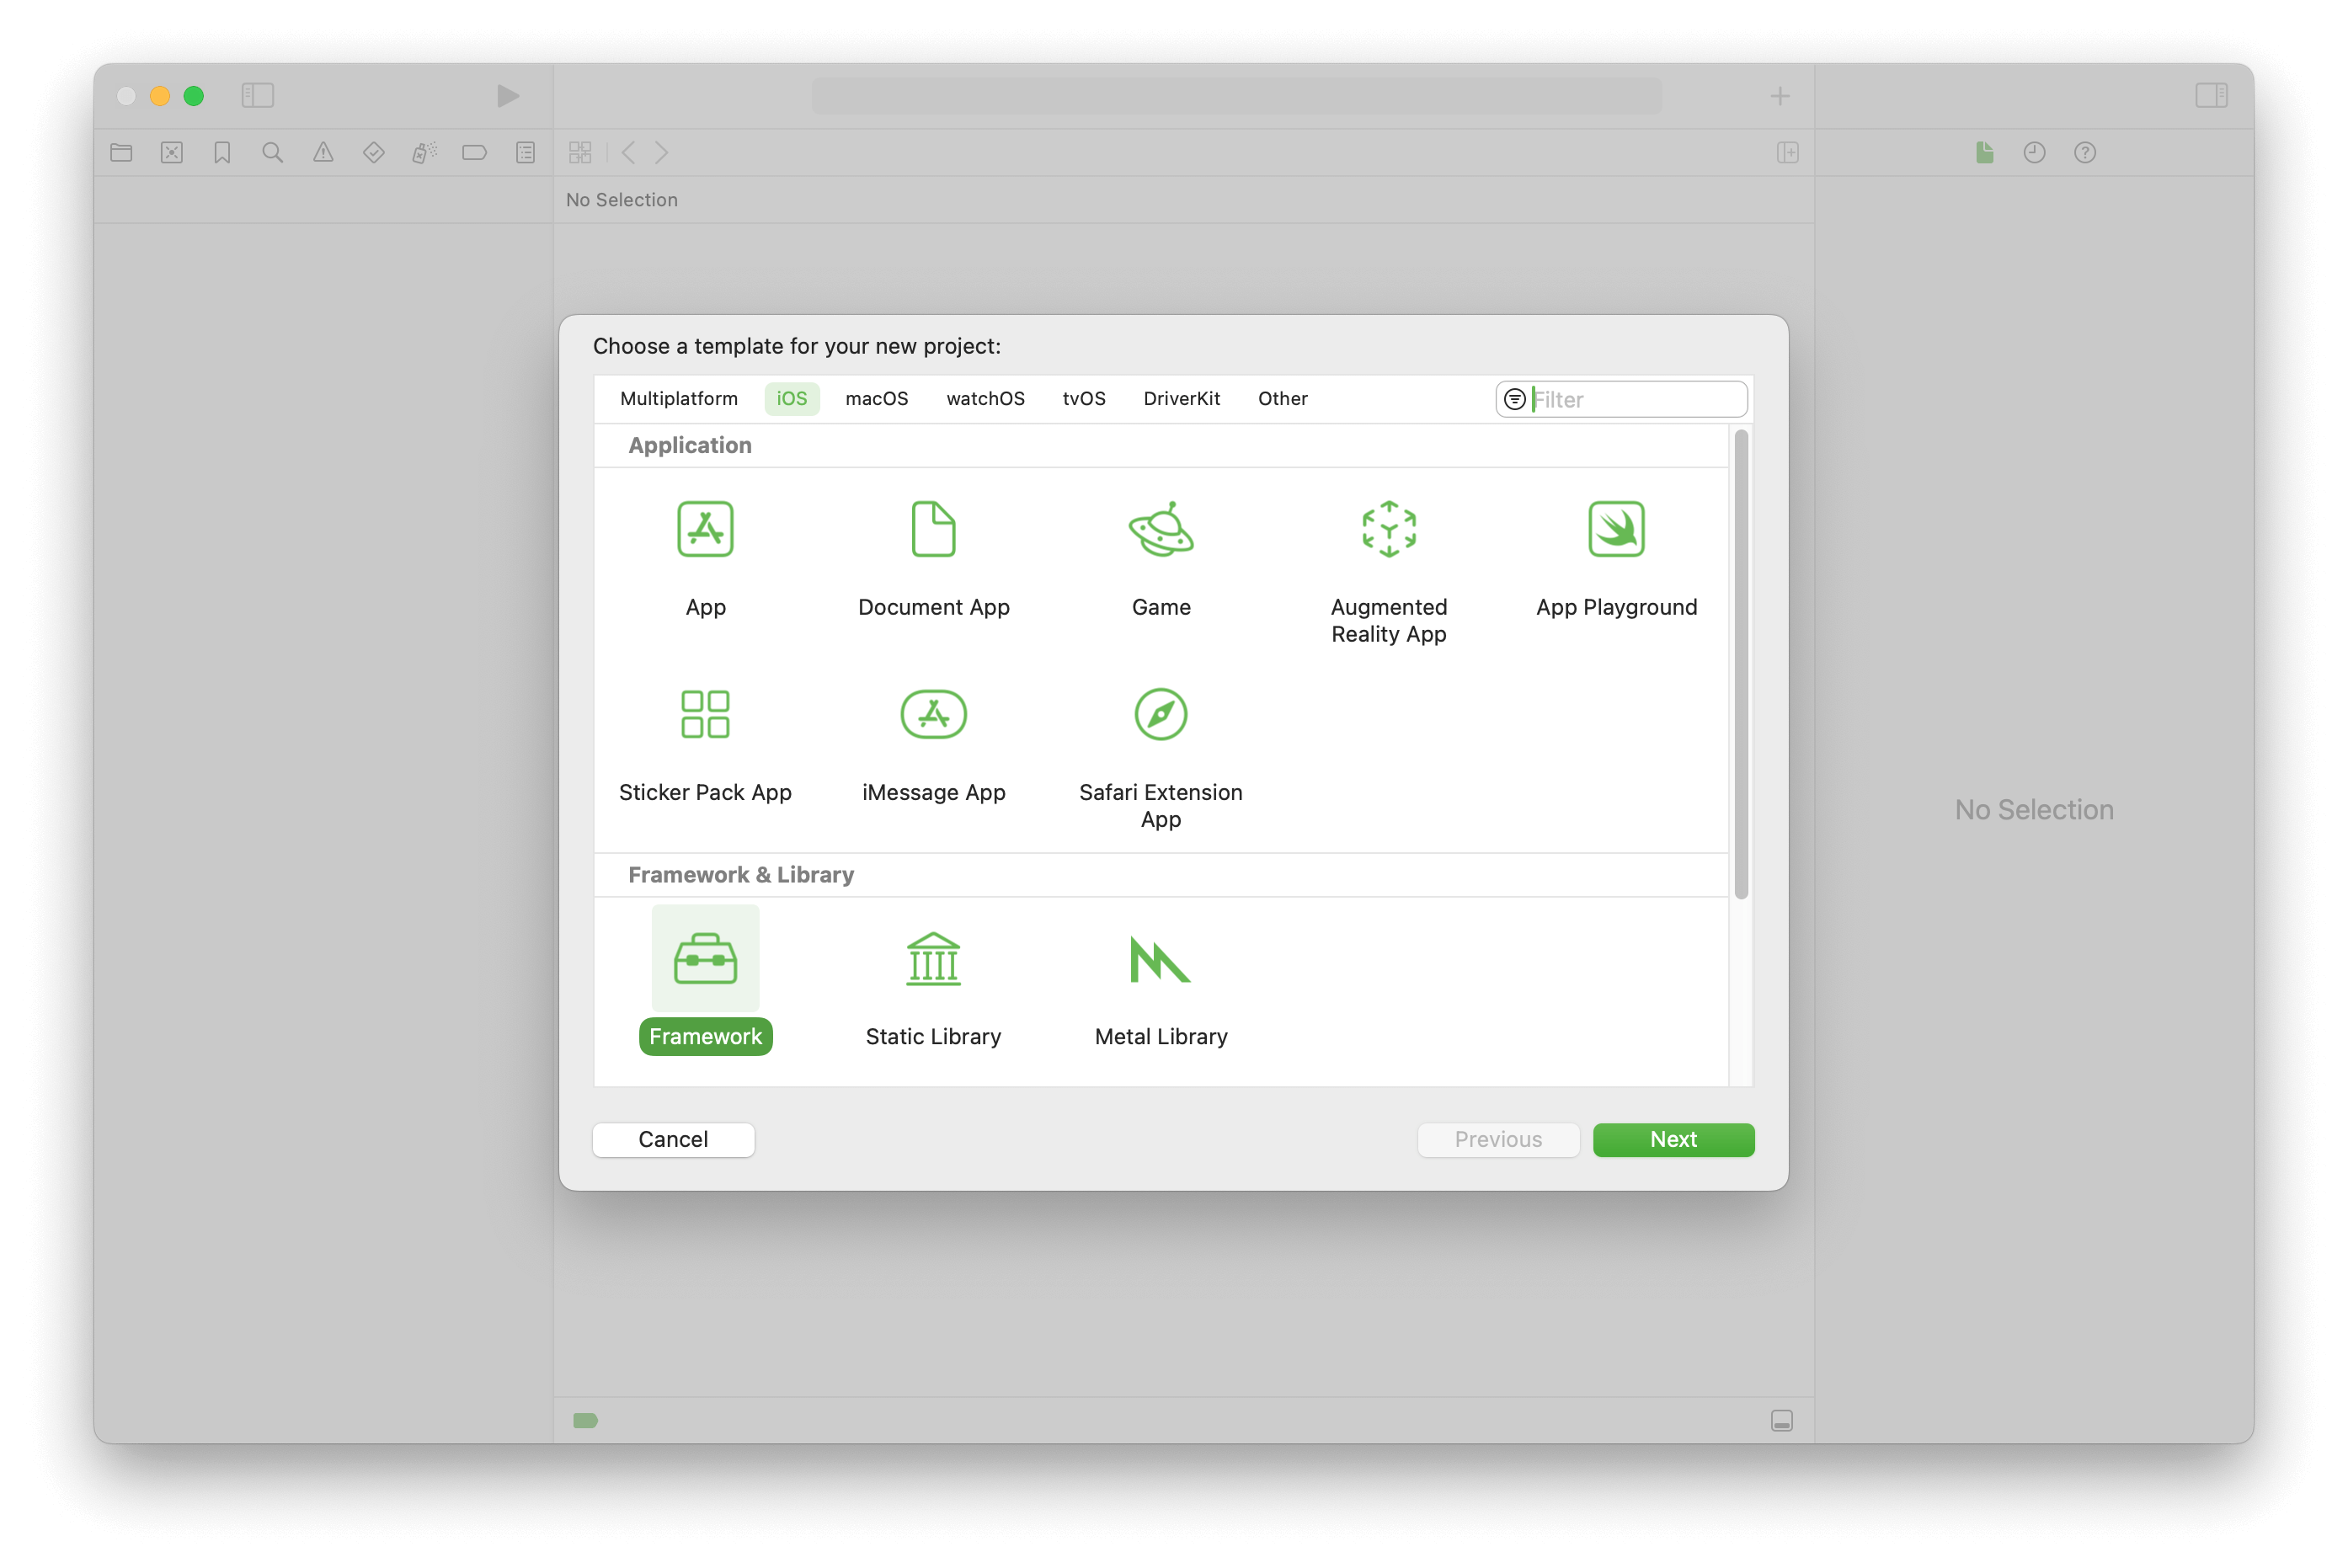
The required project type is “Framework”
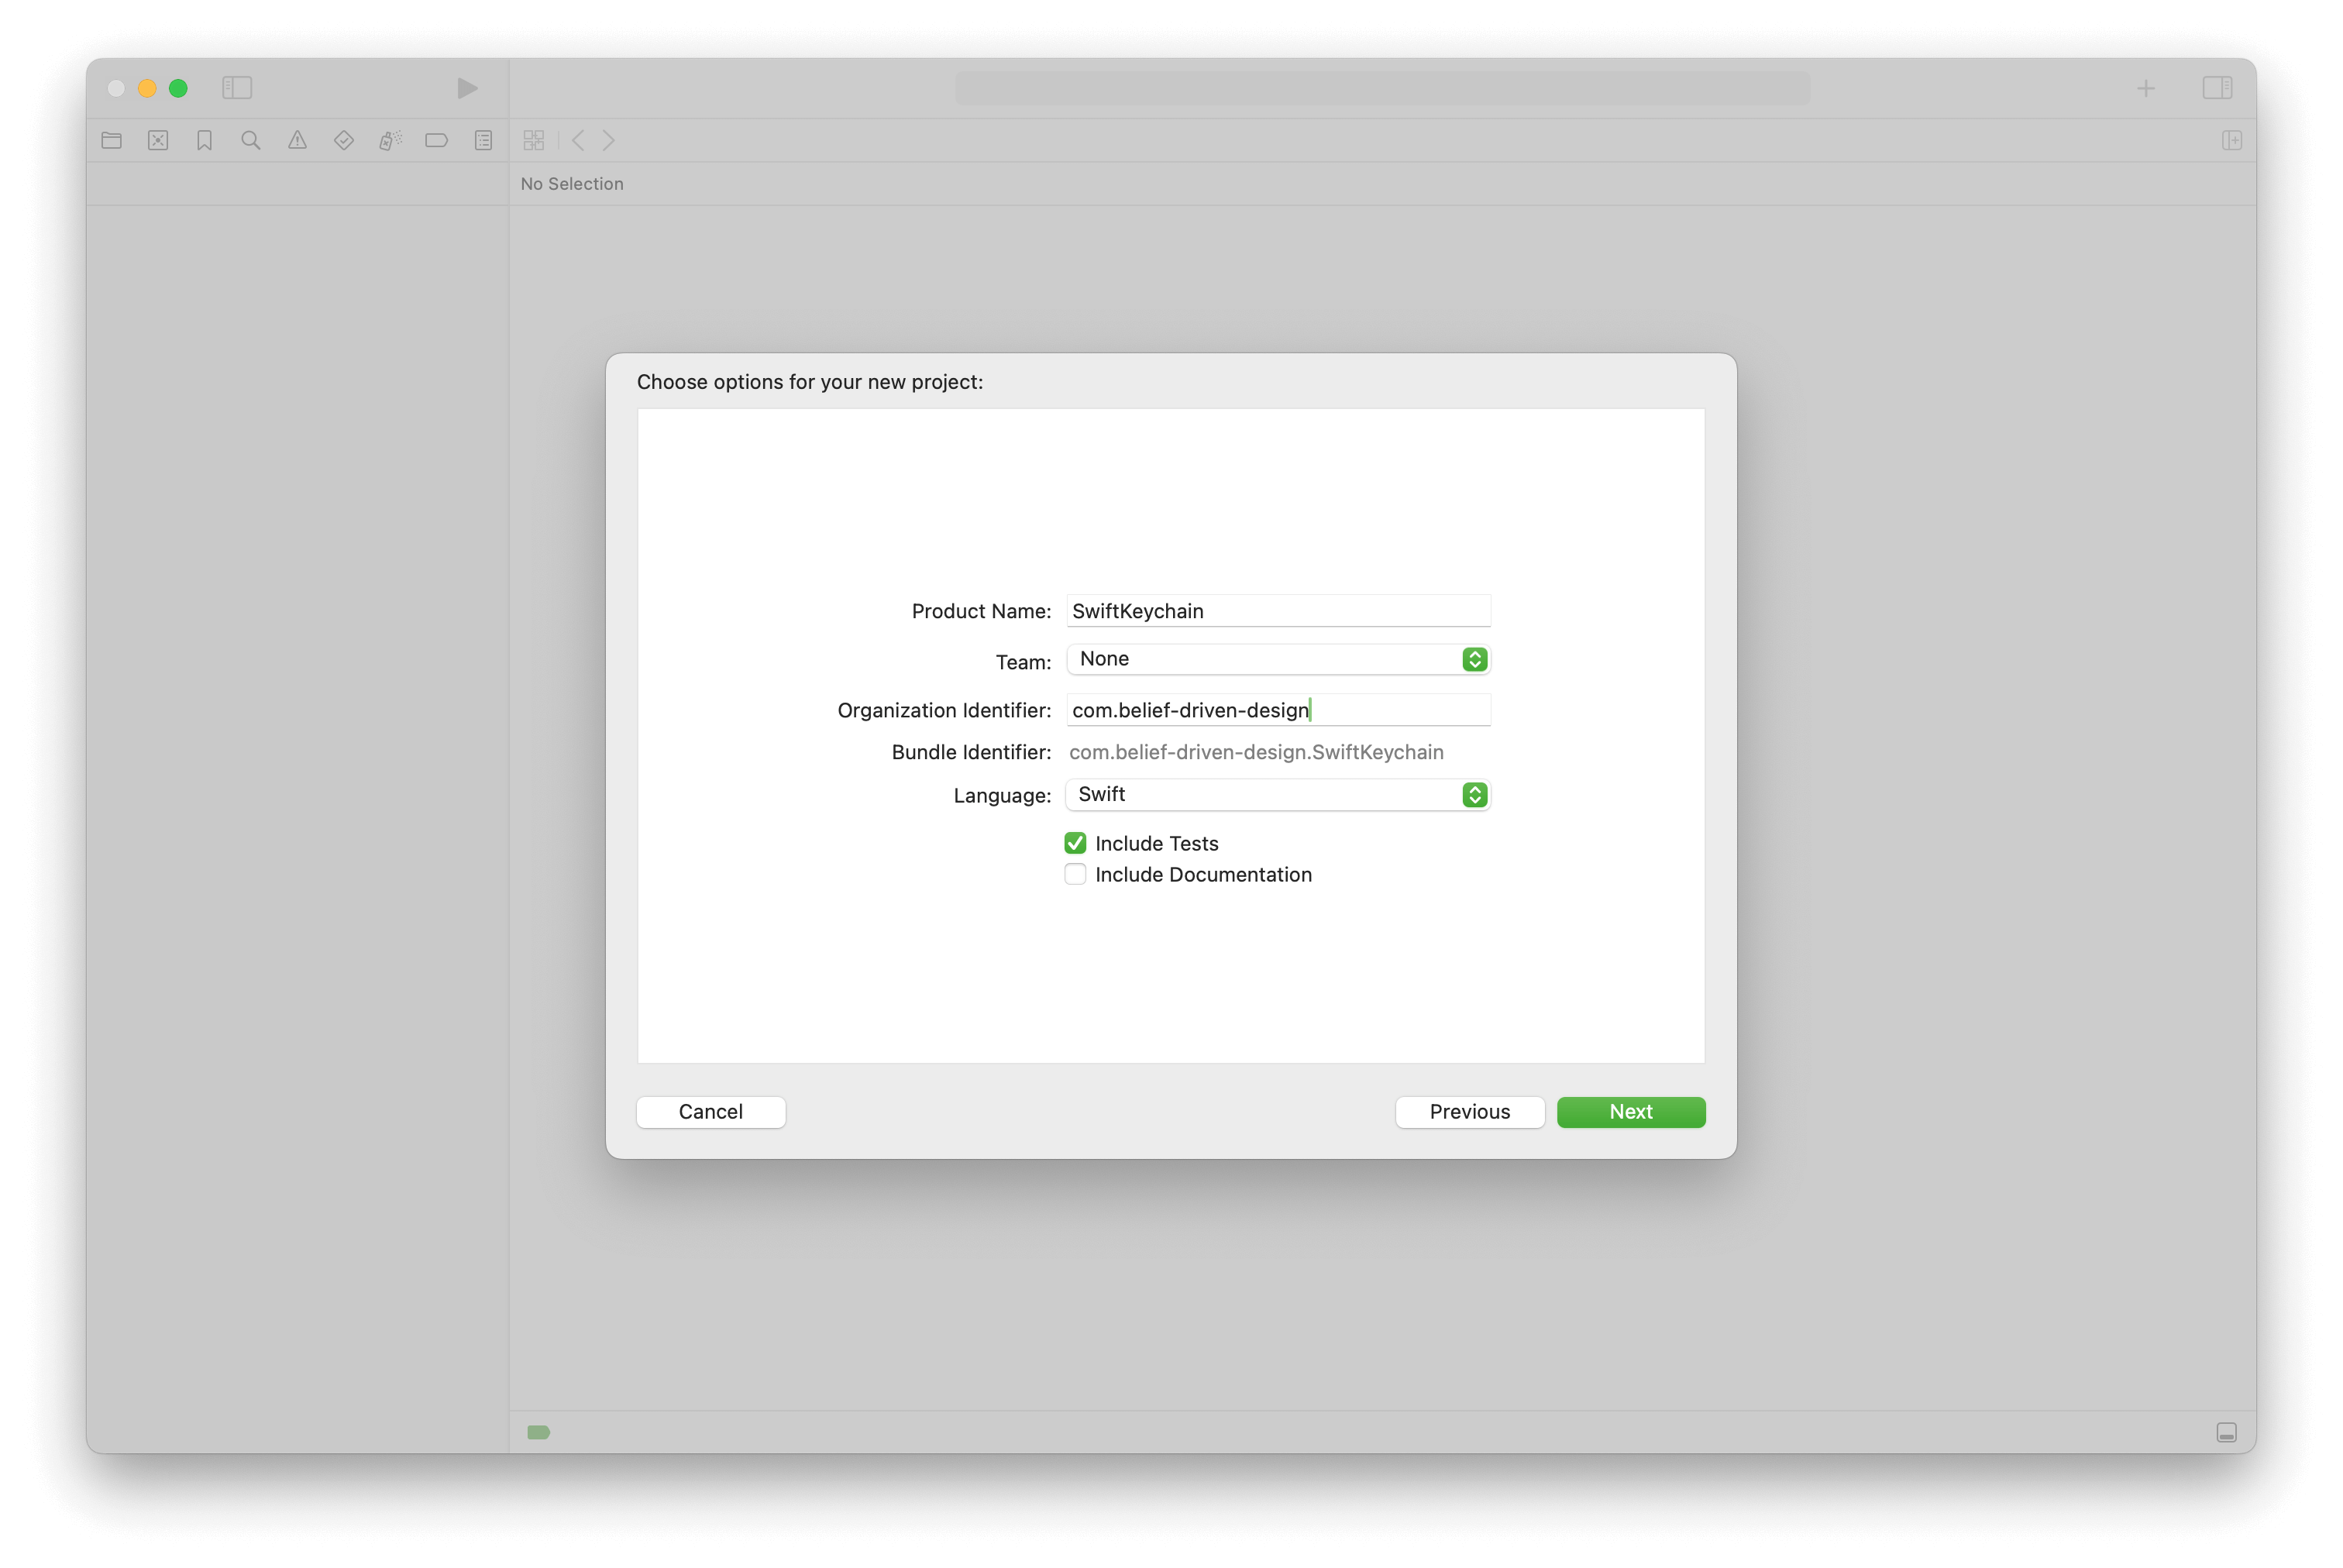
Fill in the blanks and make sure that “Include Tests” is checked, or you need to add the Test Target manually.
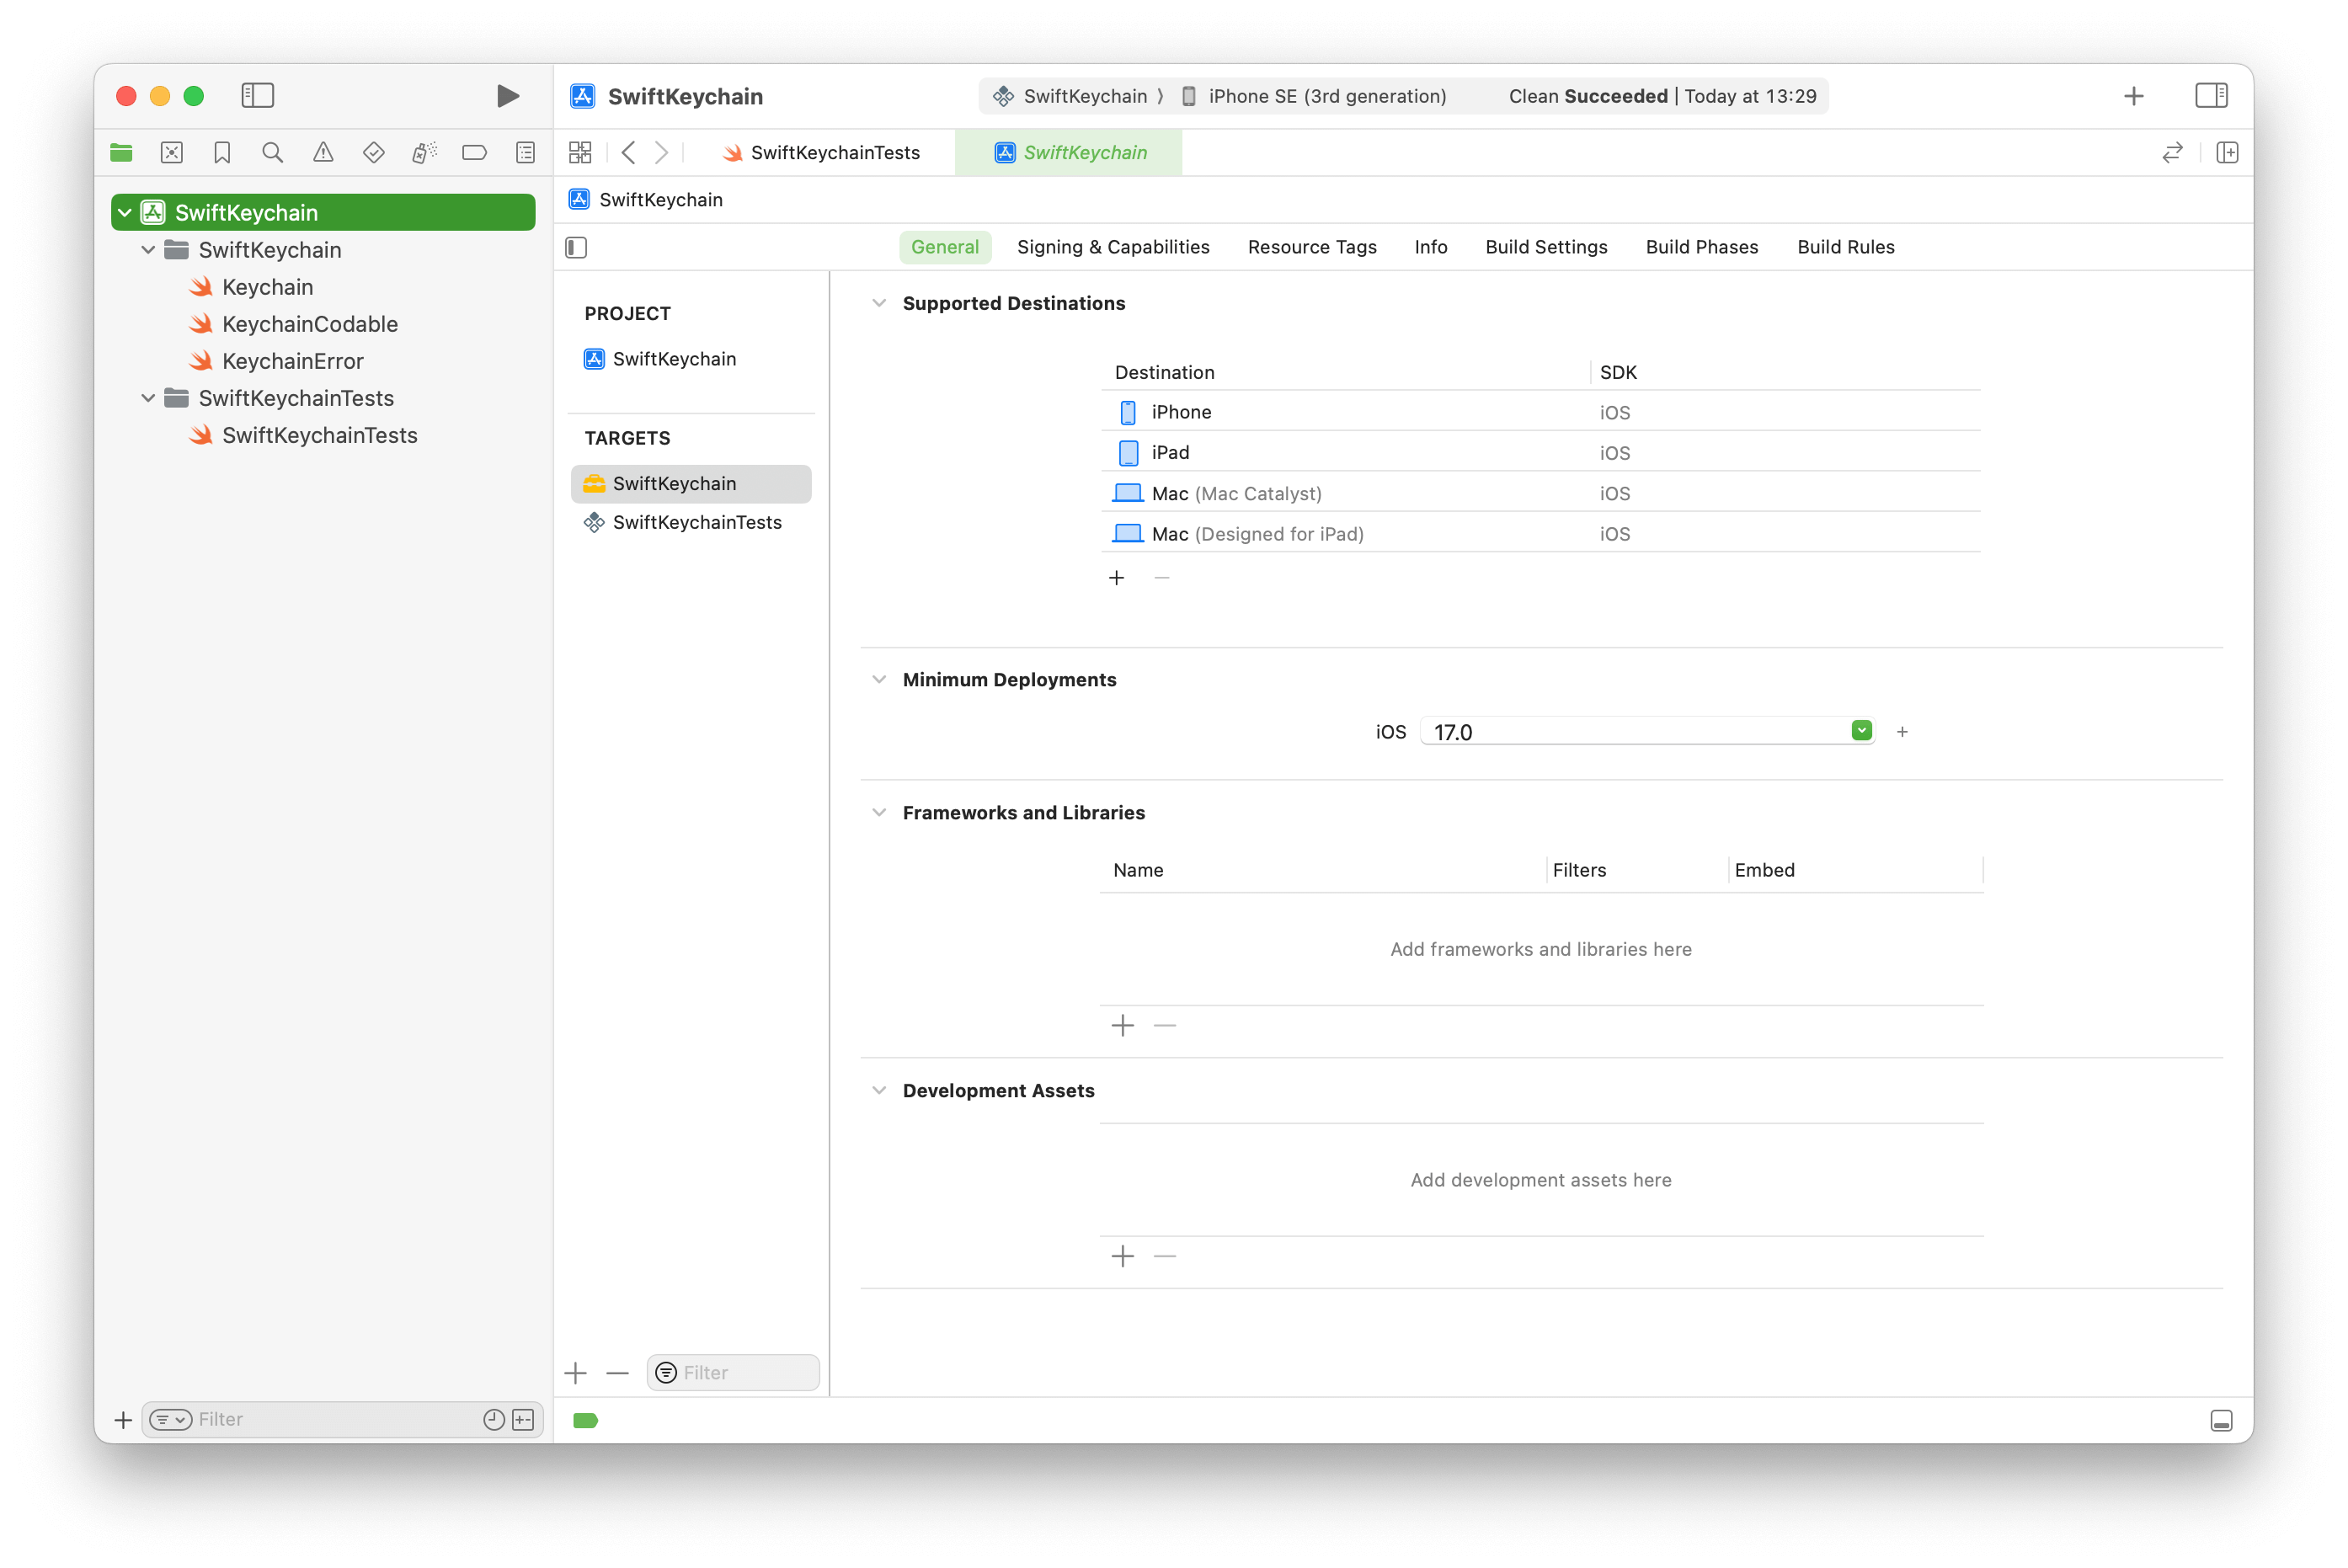
Set up the project like you intend the Swift package to be set up, like “Supported Destinations” and “Minimum Deployments. If any of the settings differ (too much), you might not get a representative picture of how the Swift package will behave when used as a package and not as a Swift Framework.
Step 2: Copy Over Source Code
If you’ve already worked on your Swift package, like I did with SwiftRegistry, now is the time to copy over any existing files to the new project and place them into the appropriate folders and Targets.
Right now, the project represents the same state as the Swift package it’s based on, which is reflected in the same error if the tests are run.
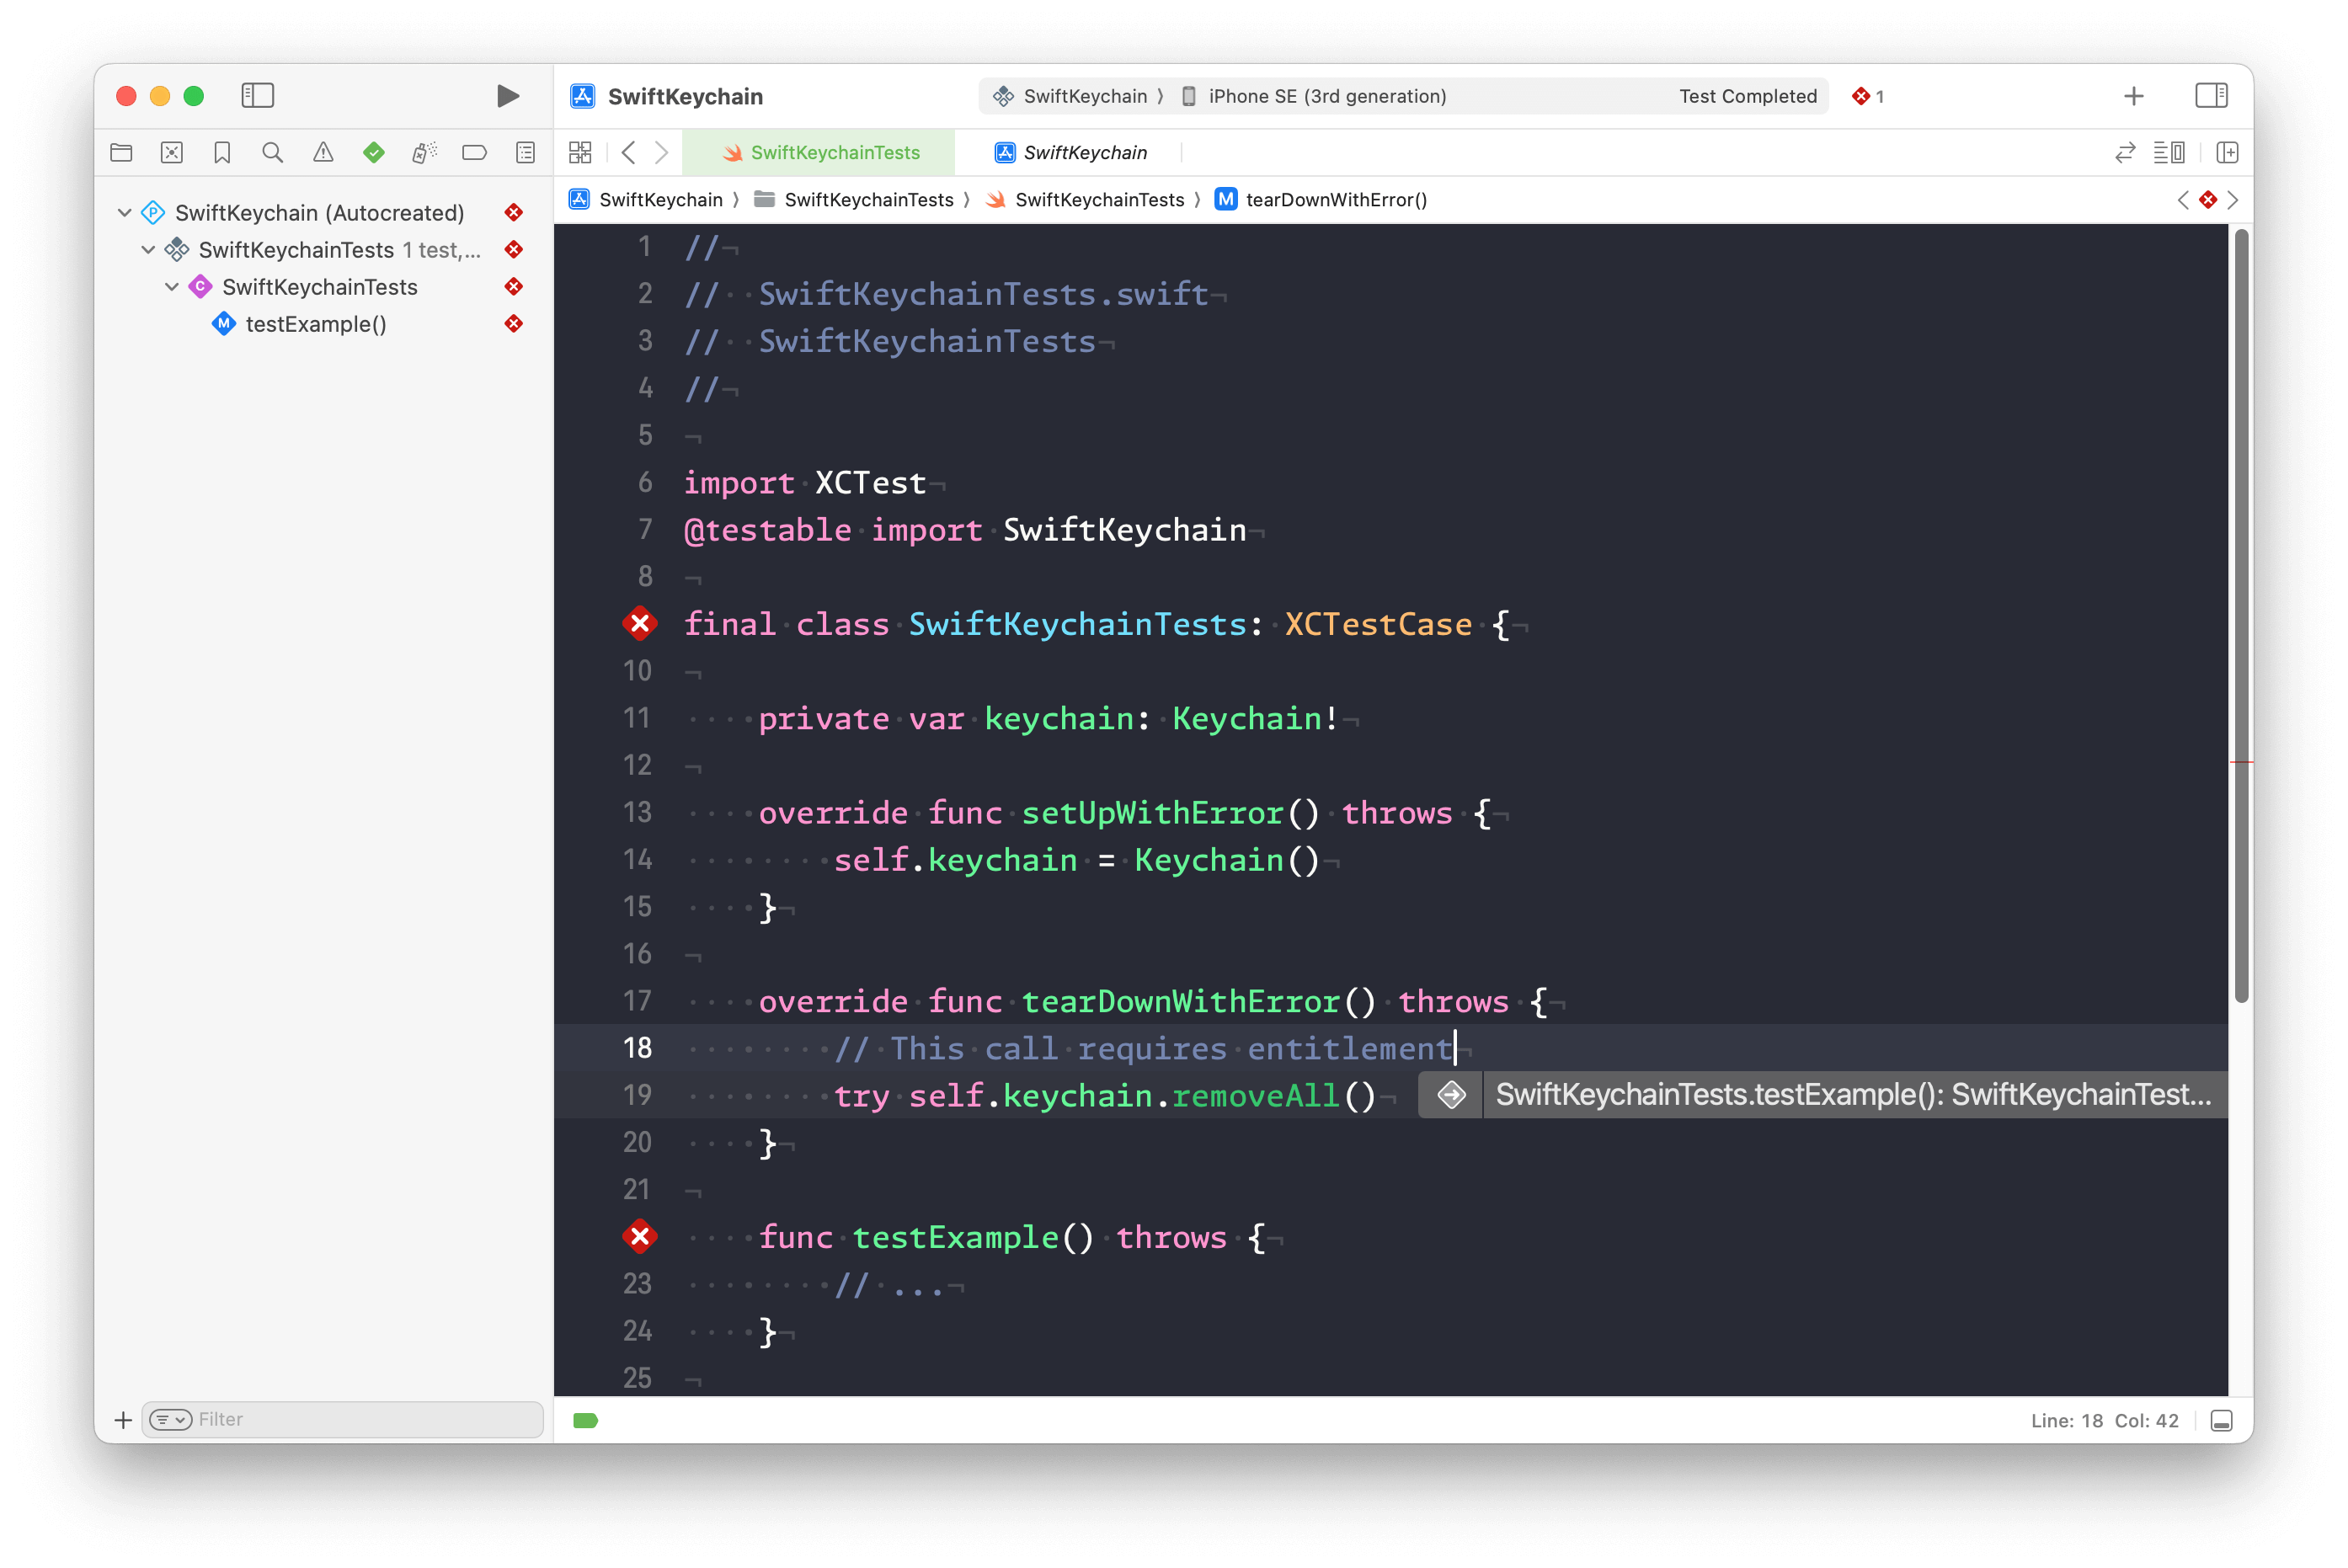
To mitigate this, we need to add a Test Host.
Step 3: Add Test Host Application
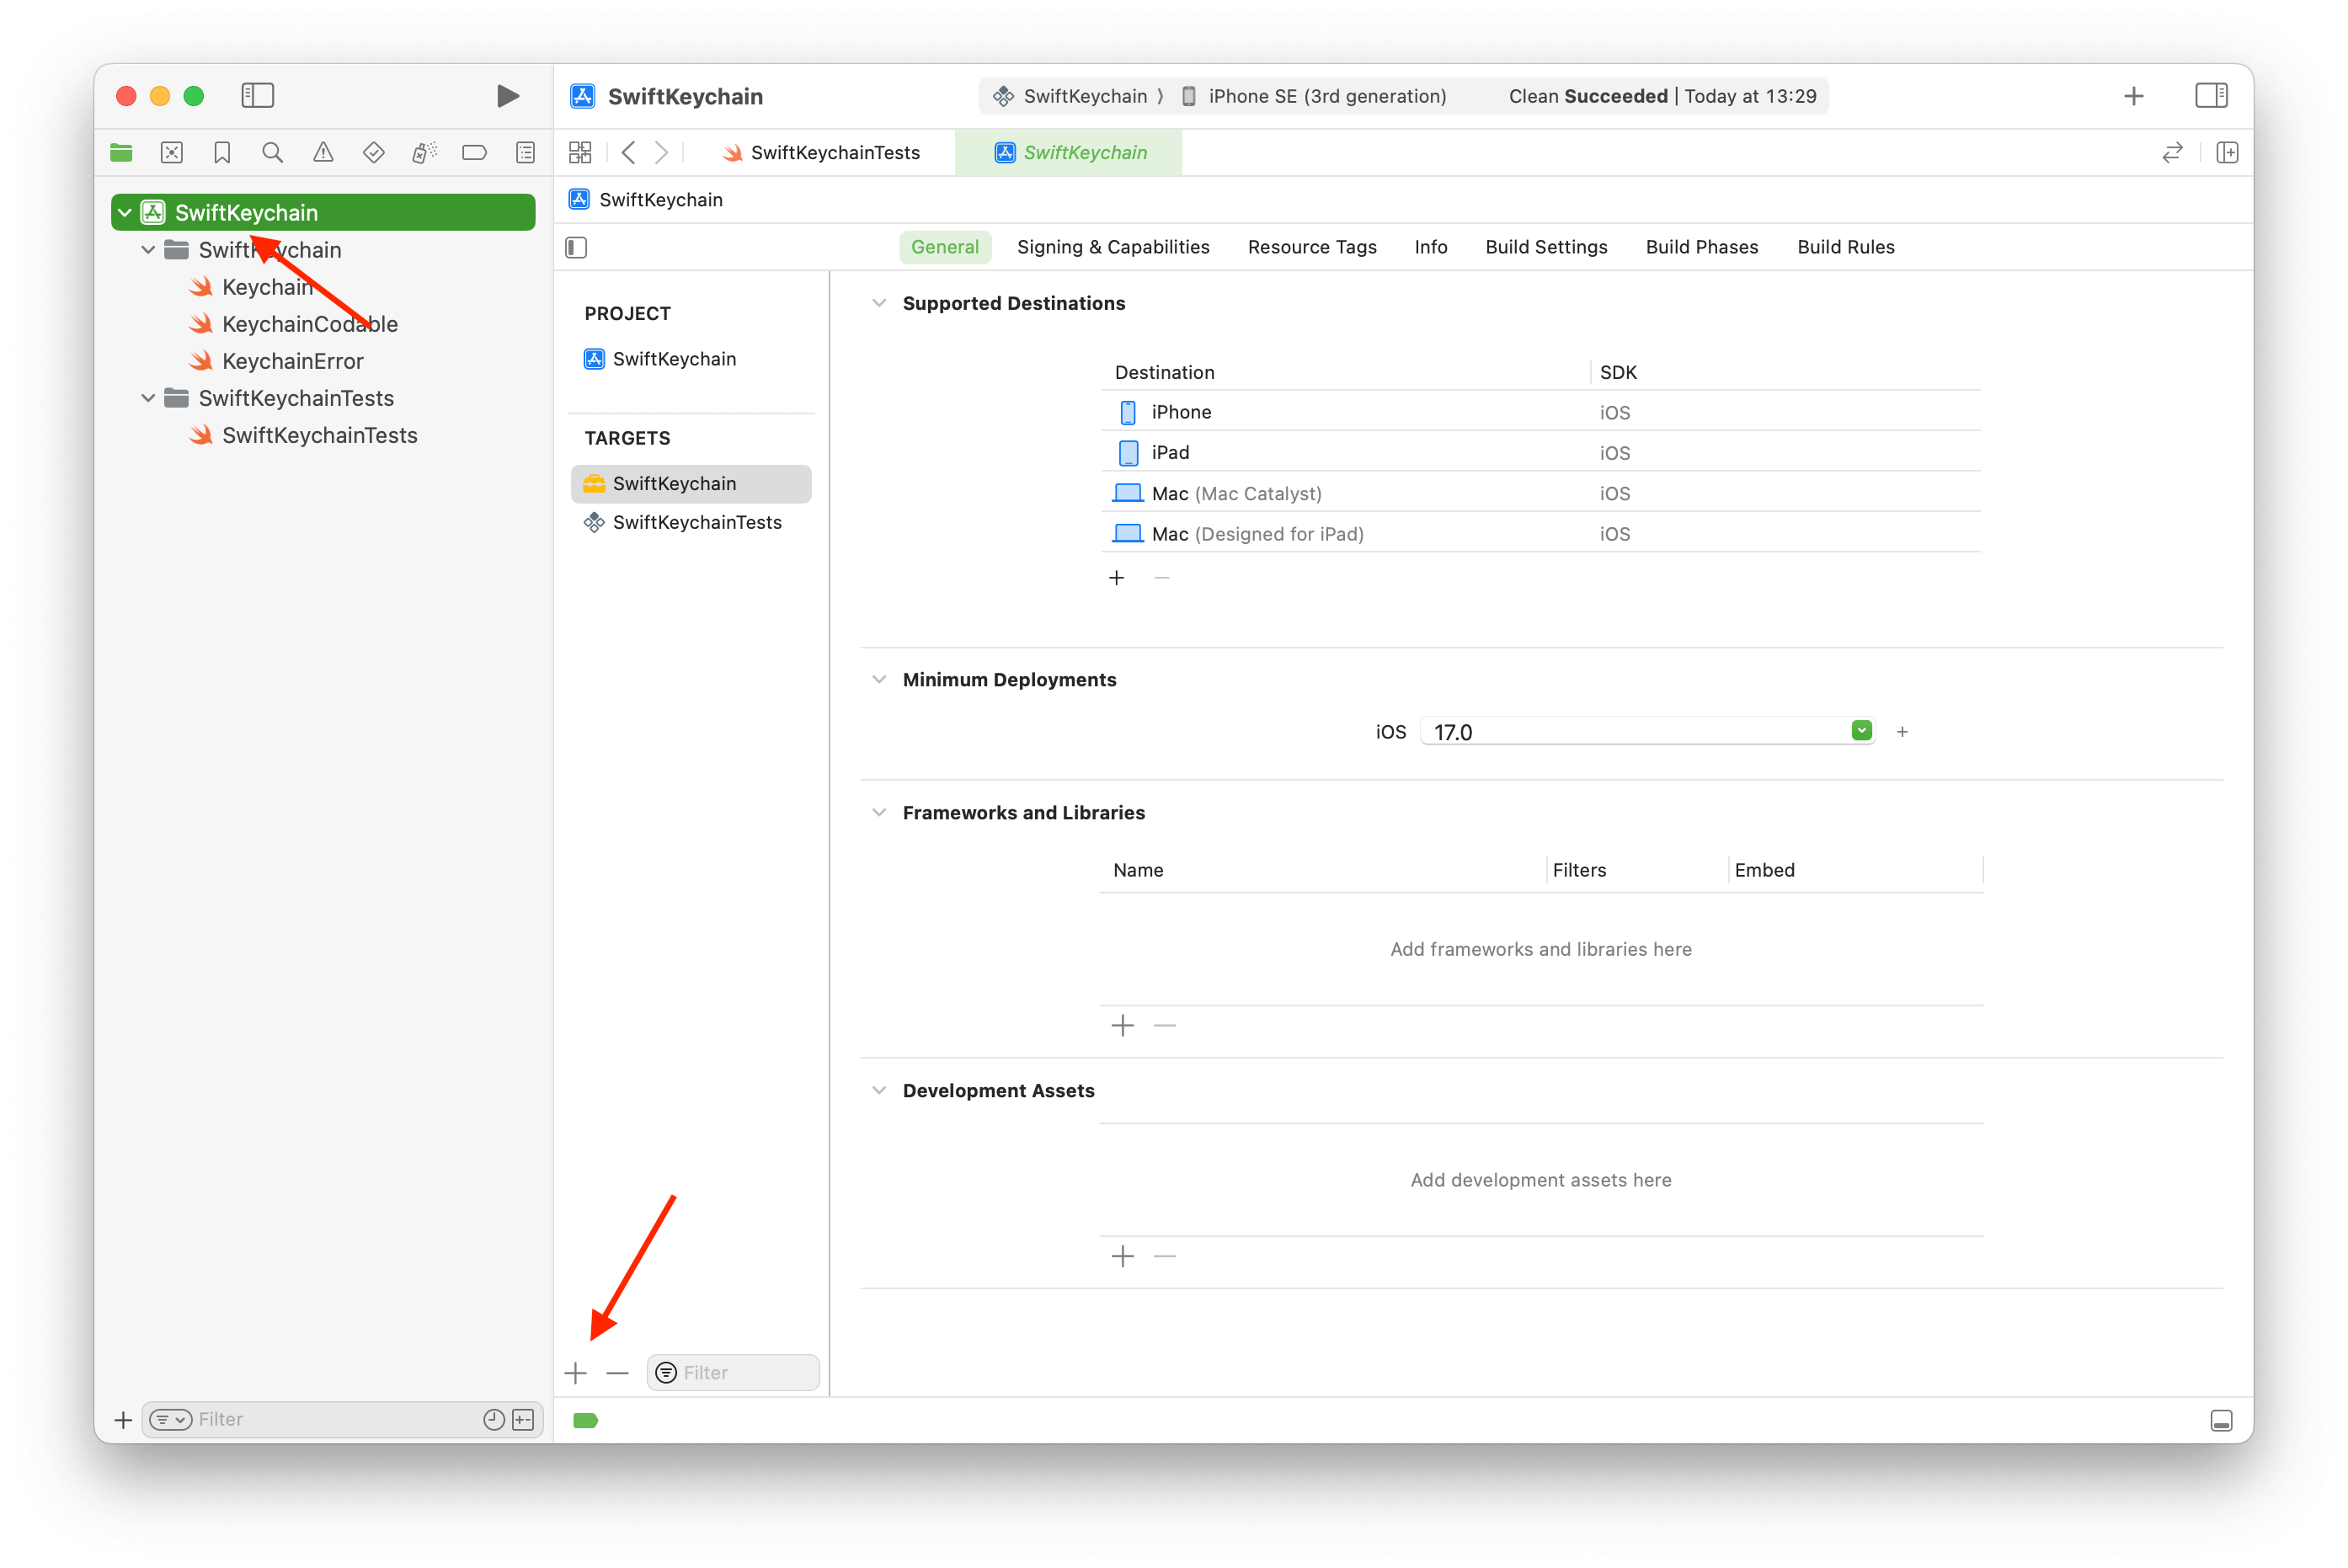
Select the project node in the Navigator and click the + (plus) icon in the Target area.
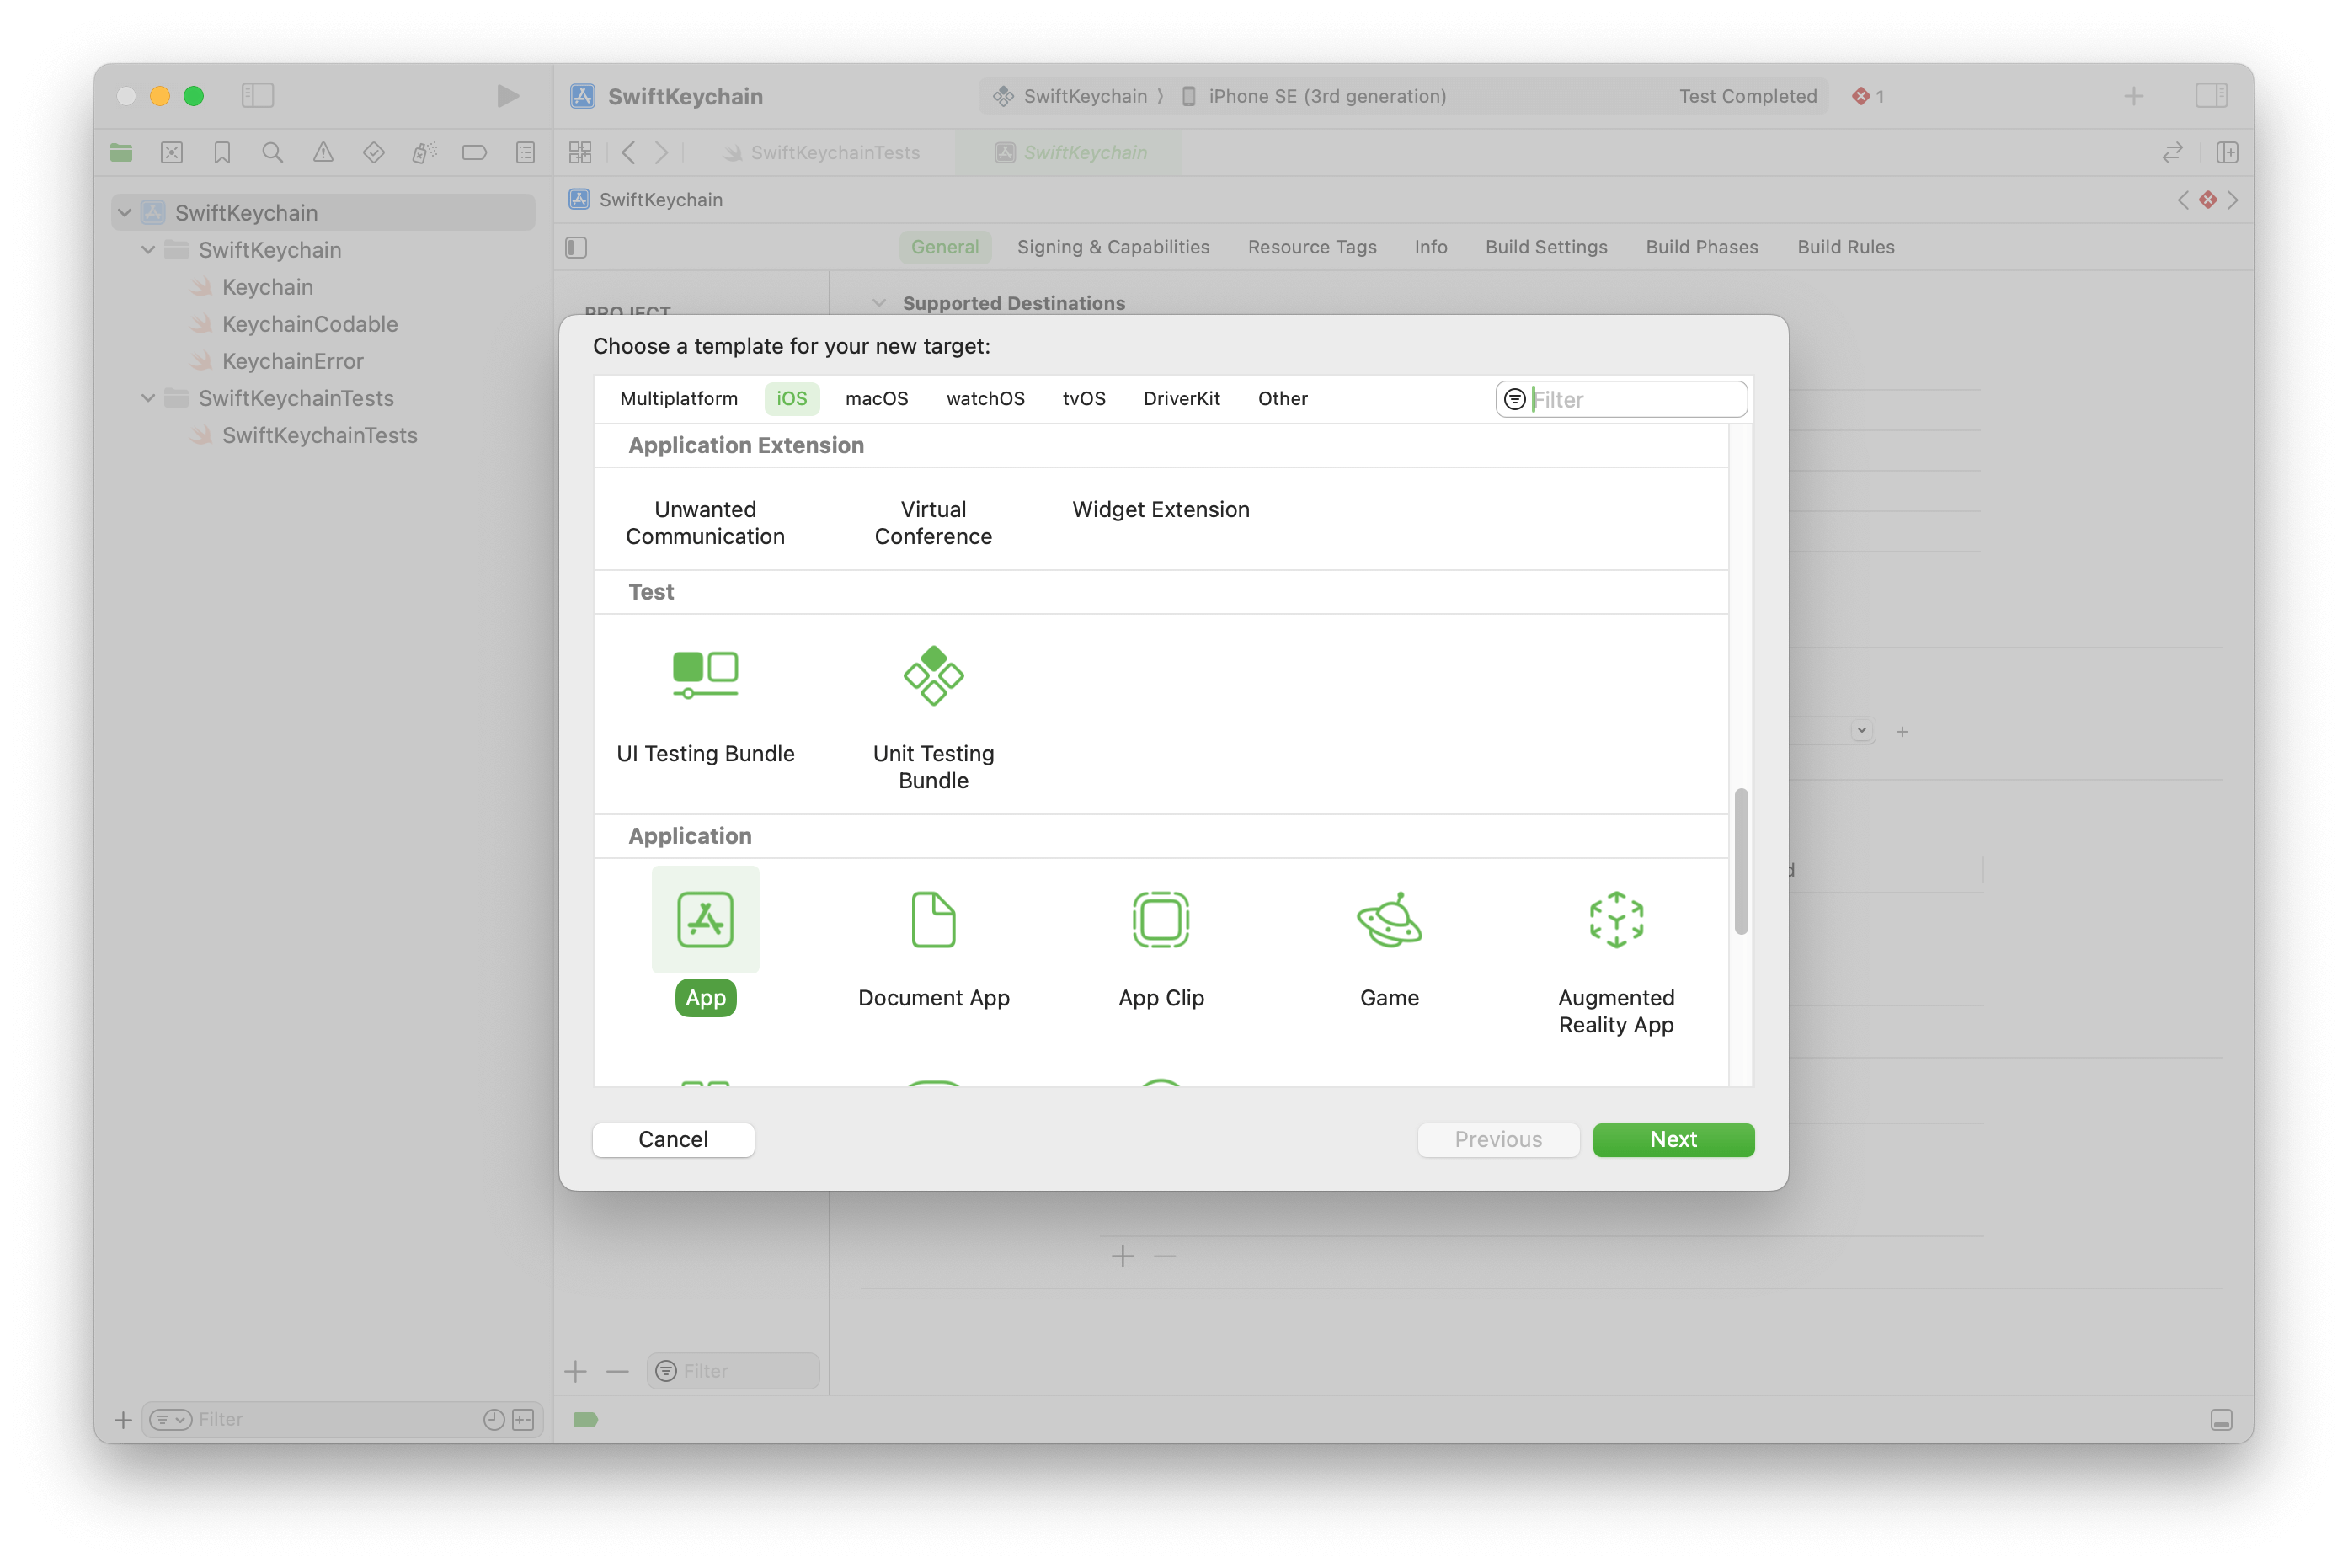
In the wizard, select “App” under the “Application” grouping.
Fill-in the blanks again, but this time for the Test Host. Don’t include Tests; we already have a Test Target we can use. The actual values don’t matter much, though, it’s an empty husk used only for testing.
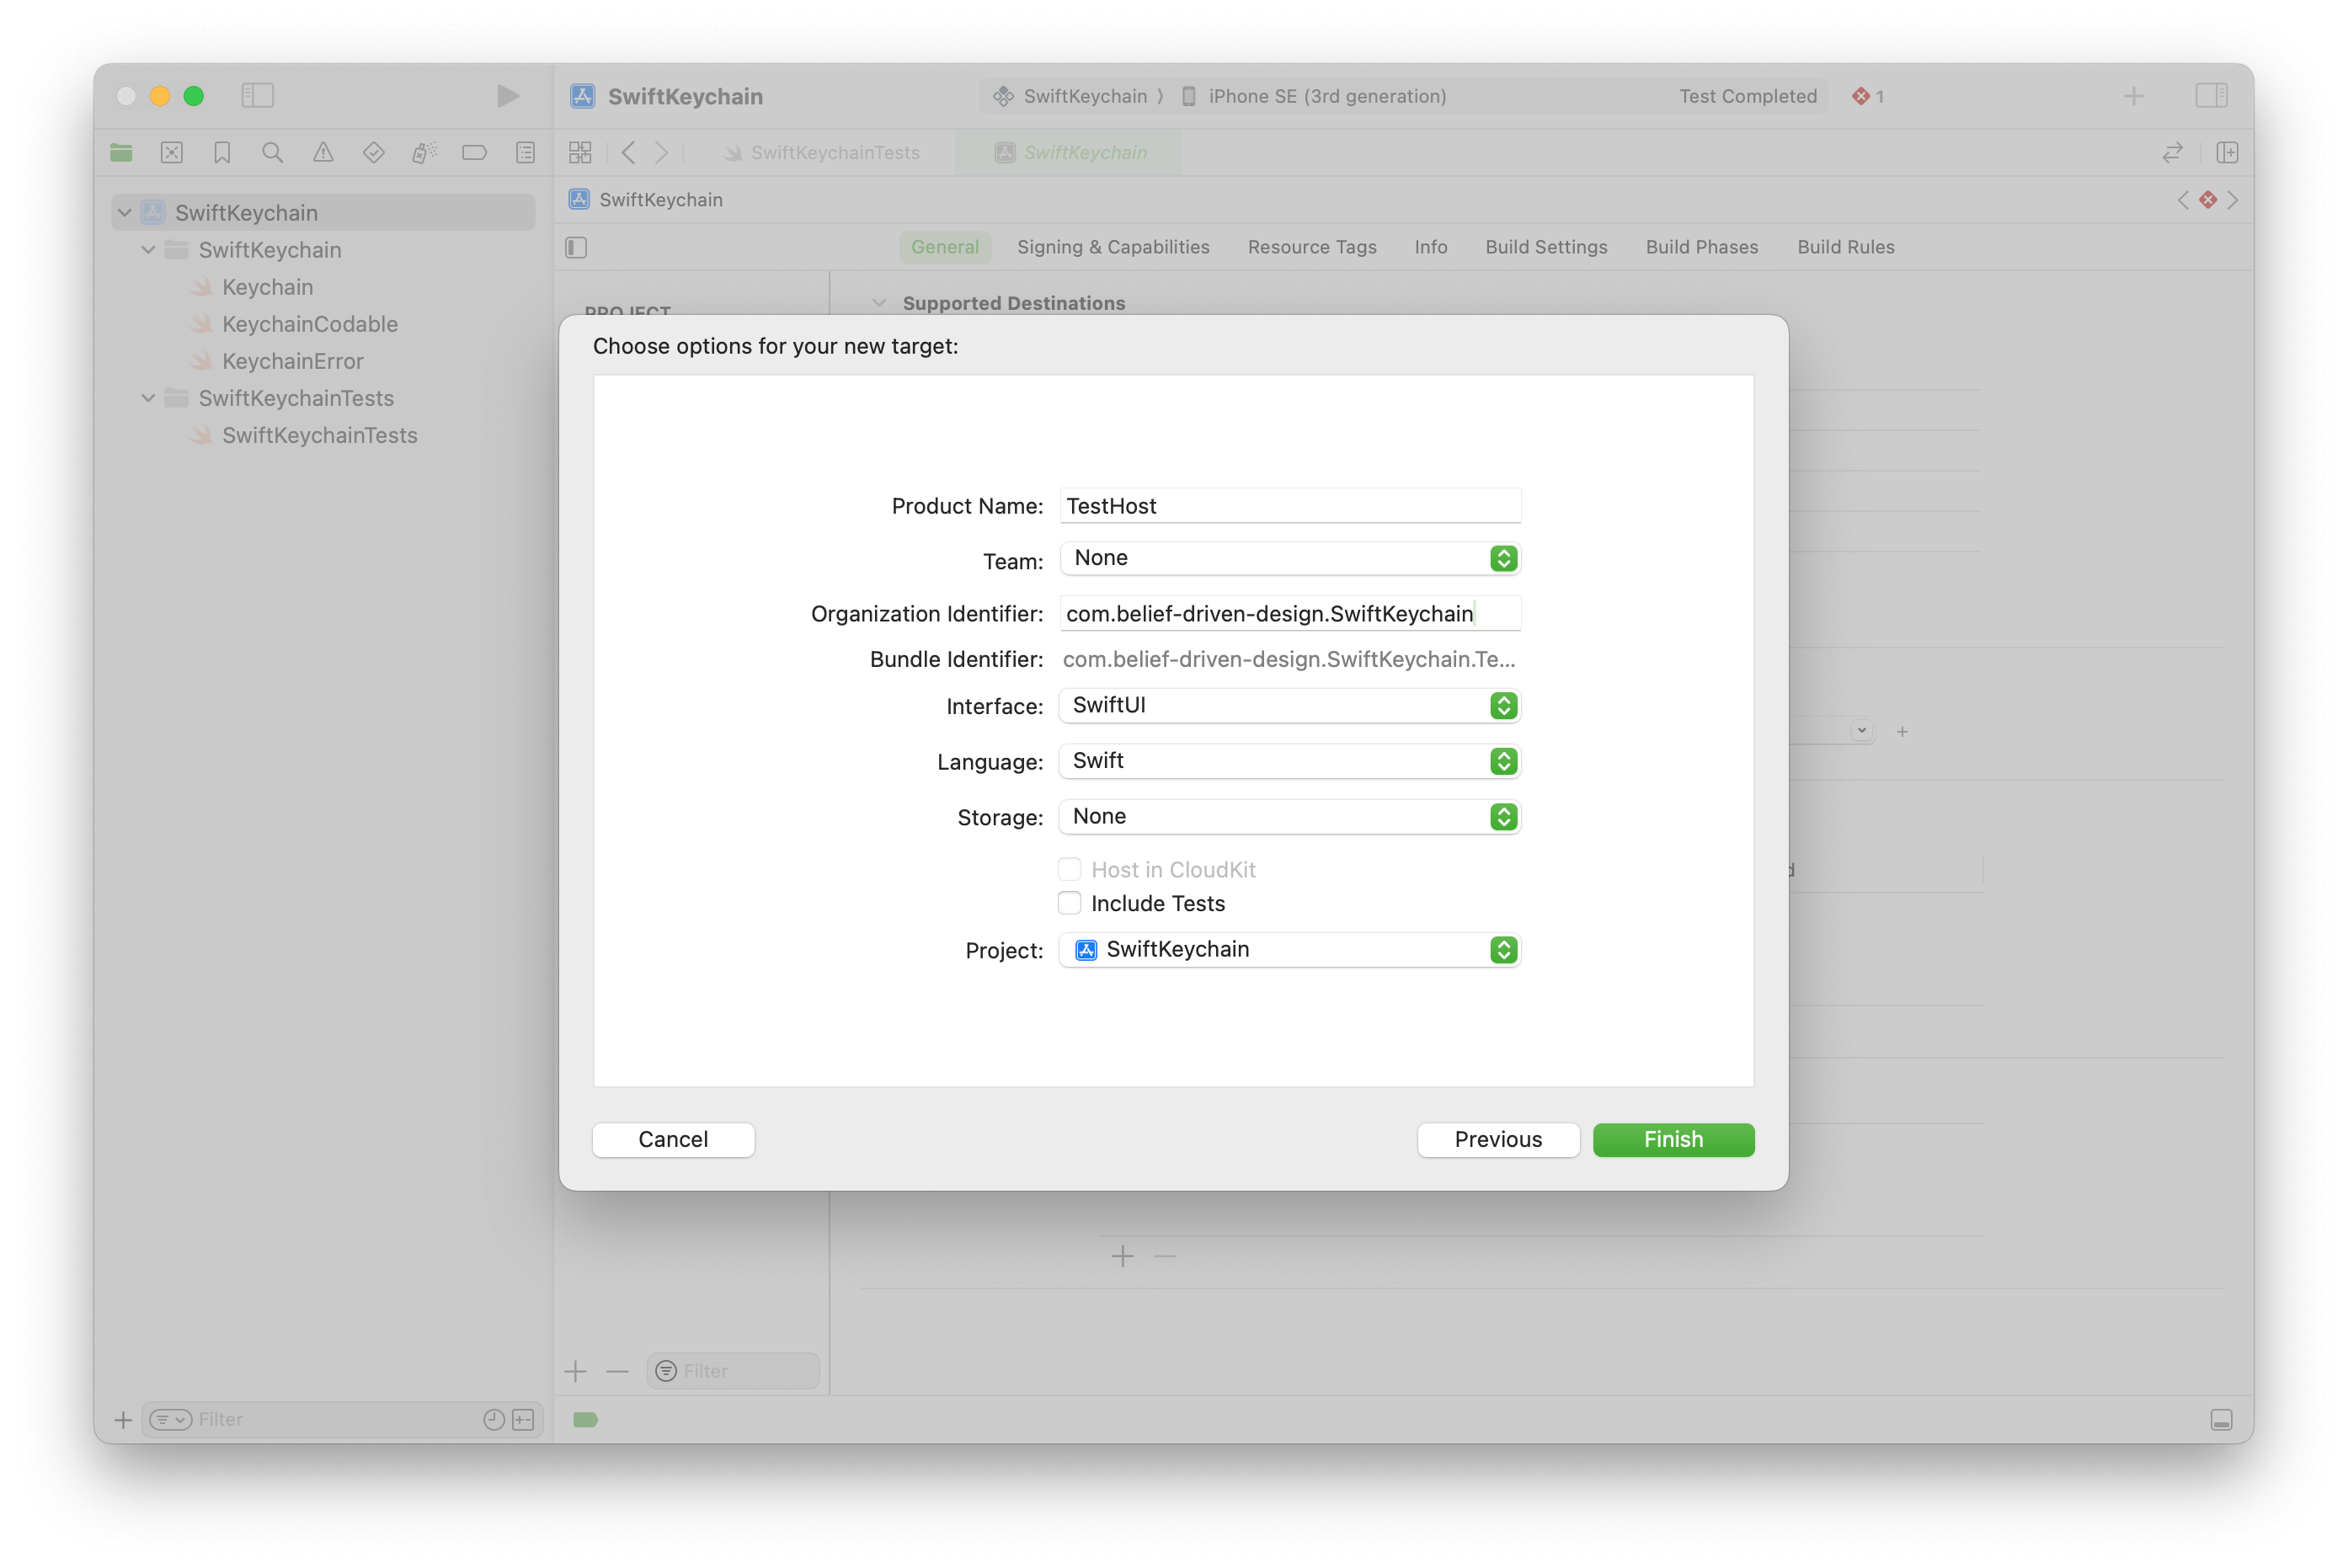
I suggest using an “Organization Identifier” that includes the name of the base project so there’s some kind of connection. The actual name can be anything, too, but you need to remember it in the next step. Using “TestHost” is an obvious choice, and adding a suffix like “Mac” makes sense, too, if you need an additional Test Host application.
Next, let’s connect SwiftKeychainTests with the TestHost app.
Step 4: Connecting the Test Host
Select the SwiftKeychainTests Target and go to “Build Settings”.
There, you’ll find the setting “Test Host” setting under “Testing”.
Even though Xcode usually differentiates between Debug and Release, both values can be set at once.
Double-click the right side instead of expanding the dropdown and fill in $(BUILT_PRODUCTS_DIR)/TestHost.app/TestHost
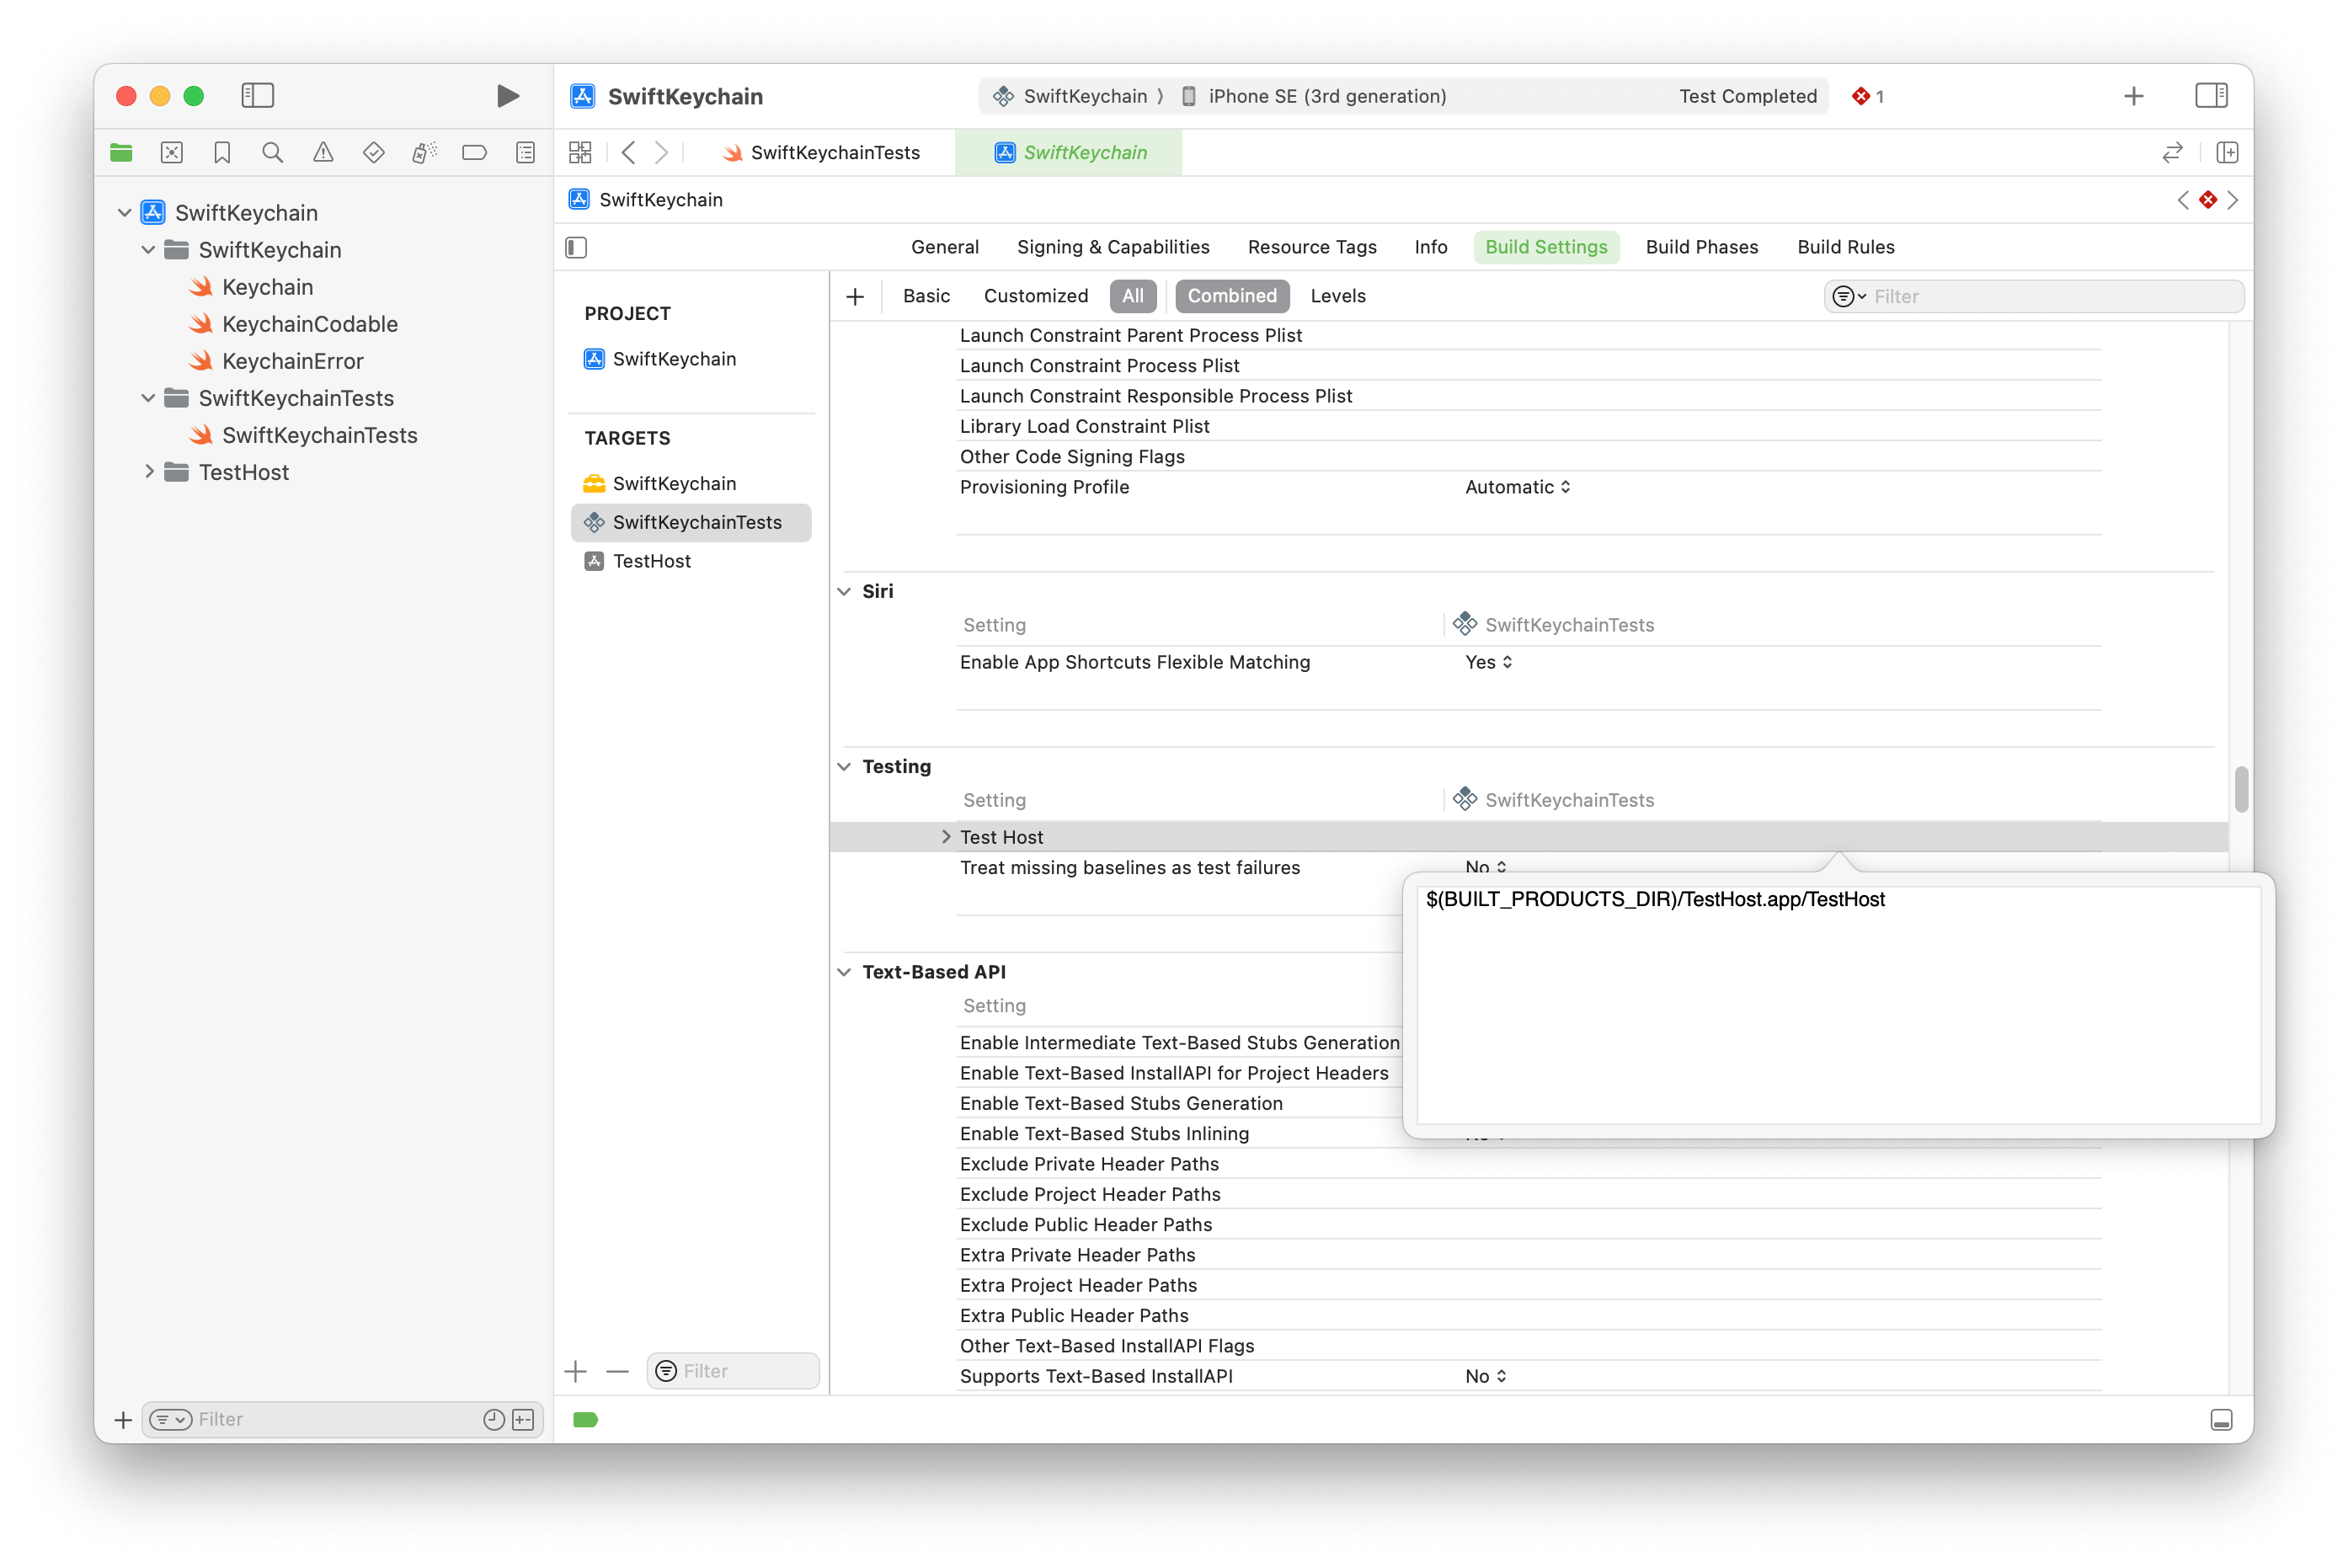
The variable $(BUILT_PRODUCTS_DIR) ensures that the two options use the correct path.
Connection is done, next is preparing the host’s environment.
Step 5: Adding Capabilities
We’re almost there!
Add the required capabilities to the Test Host.
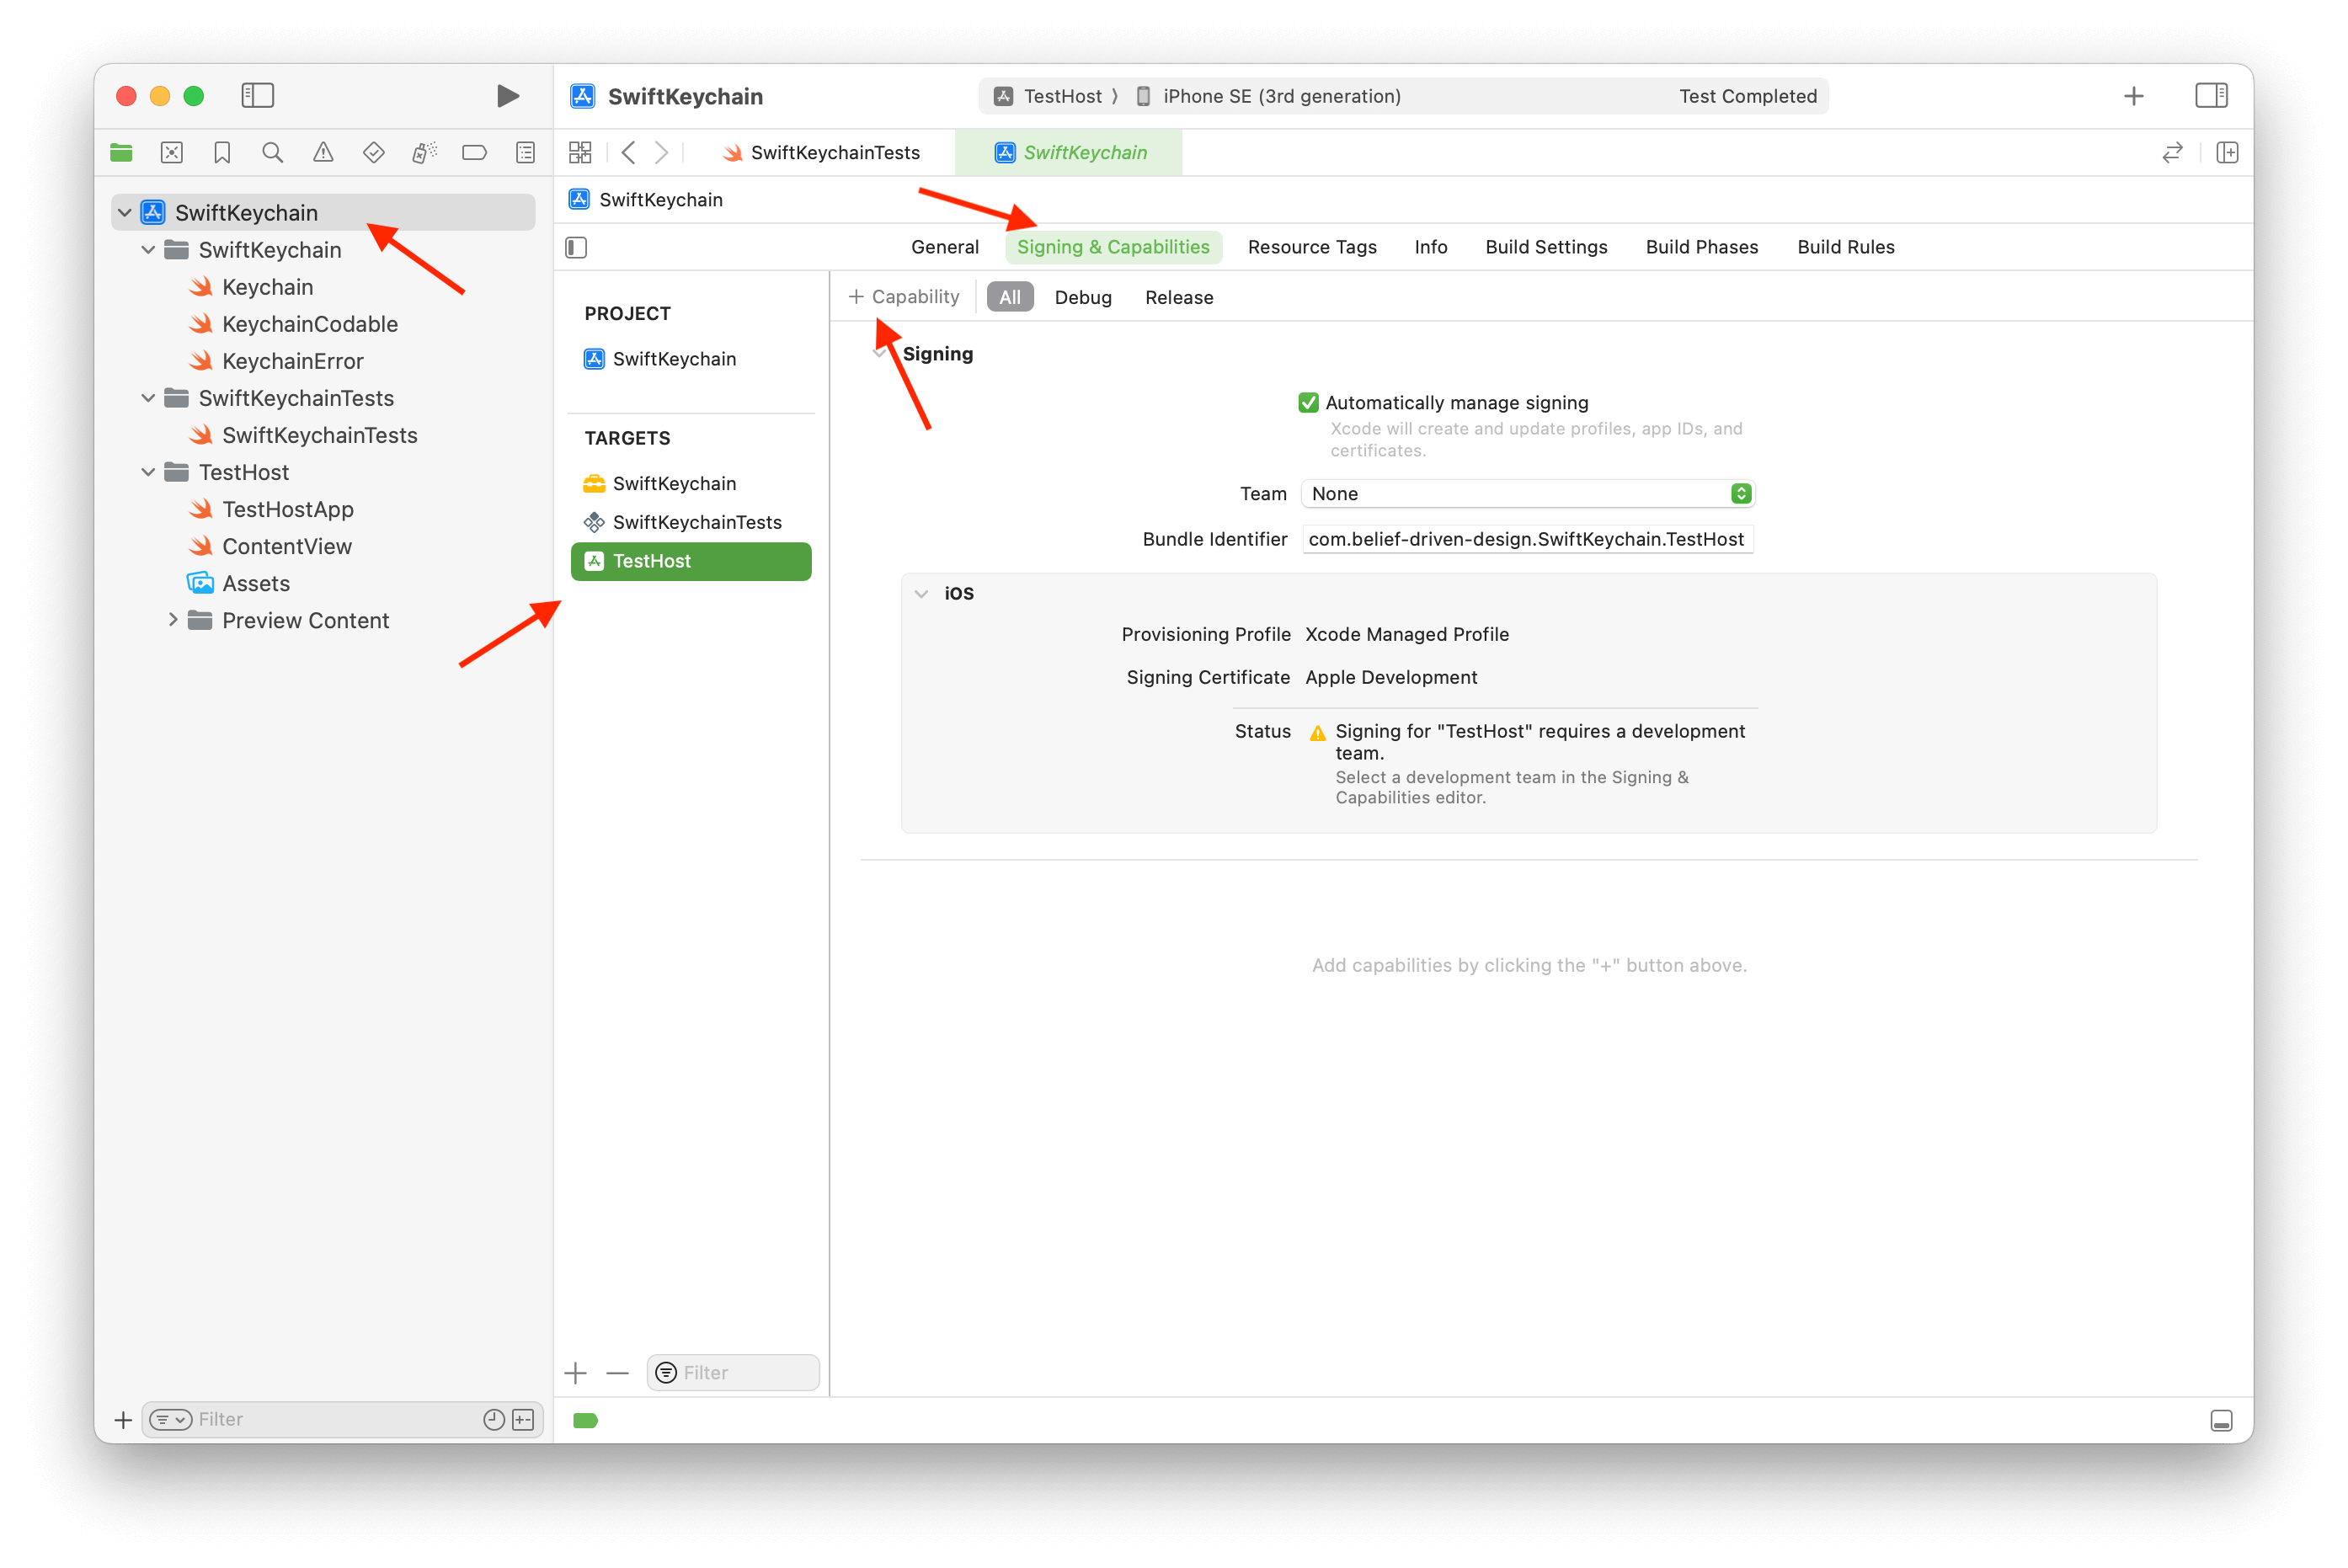
In the case of SwiftKeychain, I’ve added “Keychain Sharing”, but what’s exactly needed depends on what your Swift package does.
That’s it for the Xcode part!
The test will no longer fail. At least not because of a missing Entitlement…
Step 6: Adding a Package.swift
To actually consume the project as a Swift package and not as a Framework, it still needs a Package.swift file.
But you can’t add it to the Xcode project directly!
Well, you could, but Xcode doesn’t understand the import PackageDescription statement and shows a compiler error.
Instead of adding the file to the project, copy or create the file directly at the root outside of Xcode.
// swift-tools-version: 5.9
import PackageDescription

let package = Package(name: "SwiftKeychain",
                      platforms: [.iOS(.v15)],
                      products: [
                        .library(name: "SwiftKeychain",
                                 targets: ["SwiftKeychain"])
                      ],
                      targets: [
                        .target(name: "SwiftKeychain",
                                path: "SwiftKeychain")
                      ])
A not immediately obvious difference between a “usual” Package.swift and this one is the Target definition, as it includes the path argument.
The package’s source code isn’t in a folder called Source/SwiftKeychain, but in SwiftKeychain instead, so the Target must reflect that.
Also, omit a .testTarget(...) declaration, as the tests won’t work anyway.
Now that we have both an Xcode project and a Package.swift file, we can use both project styles to work the code.
Either open the xcodeproj to write and run tests, or the Package.swift to open Xcode in “Swift Package” mode.
Conclusion
Even though this simplified guide achieved the goal of creating a Swift package that’s testable when Entitlements are needed, it’s not the best solution. Now you have two projects to consider, and need to keep them synchronized regarding build settings, etc.
Personally, I prefer to work in “Swift package” mode, as Xcode doesn’t get in the way of actually working on it. Even while working on this article, I hit some bumps down the road with Xcode behaving weirdly because, well, it’s Xcode… But not having working unit tests isn’t an acceptable trade-off either, even if it means maintaining additional Test Hosts.

